
Table of Contents
- Accessing the Student Roster and Expanding Student Records
- Generating a Master Agreement
- Configuring Master Agreement Settings
- Inviting Signatures and E-Signature Options
- Finalizing and Archiving the Master Agreement
- Troubleshooting Tips
Accessing the Student Roster
To access a student’s record and initiate a Master Agreement:
-
Navigate to Teachers > PLS/Student Roster.

-
In the Student Roster, click the arrow beside a student’s record to expand it.

Note: A blue highlight on a student’s name indicates a pre-enrollment status. Once the student is fully enrolled, the highlight will change to green.
Creating a Master Agreement
To create a new Master Agreement for a student:
-
In the expanded student record, go to the Reports tab and select Master Agreements.
 .
.
-
If your School Default settings have been set, only the highlighted fields may be changed.
- Adjust the Report Type based on your requirements.
- Select the Report Version to use (if your school has multiple versions).
- If your school has established default settings for each of the templates, all fields at the bottom will be restricted from editing.

Note: For MAs being created for the next school year, ensure that the Master Course List, School Calendar, and Reporting Periods for that year are set up in the SIS.
-
Complete all required fields and click Save Master Agreement.

Existing Agreement Alert: If an active, signed Master Agreement already exists for the specified date range, a warning will appear. Click Continue to proceed or Cancel to return to the PLS Roster.
Configuring Master Agreement Settings
When configuring Master Agreement settings, please review the following options:
-
School Default Settings: When this option is enabled, only the relevant fields will be displayed on the screen, while any unnecessary fields will be hidden or automatically pre-selected for your convenience.
-
Review the page carefully and fill in the necessary information required for your Master Agreement template.
Then scroll to the bottom and select "Save Independent Student Contract (and Archive or Print)
If this is your first time using this template, you will be prompted to "save your settings." Follow the on-screen instructions to either archive or print the Master Agreement.
If you try to save the Master Agreement before filling in all the required fields, a prompt will appear to help you identify and complete any missing information. Once you've successfully completed the missing fields, you will have the option to either Archive or Print the Master Agreement. If you are collecting electronic signatures, choose the Archive option; if you need to gather physical signatures, select Print.

Inviting Signatures and E-Signature Options
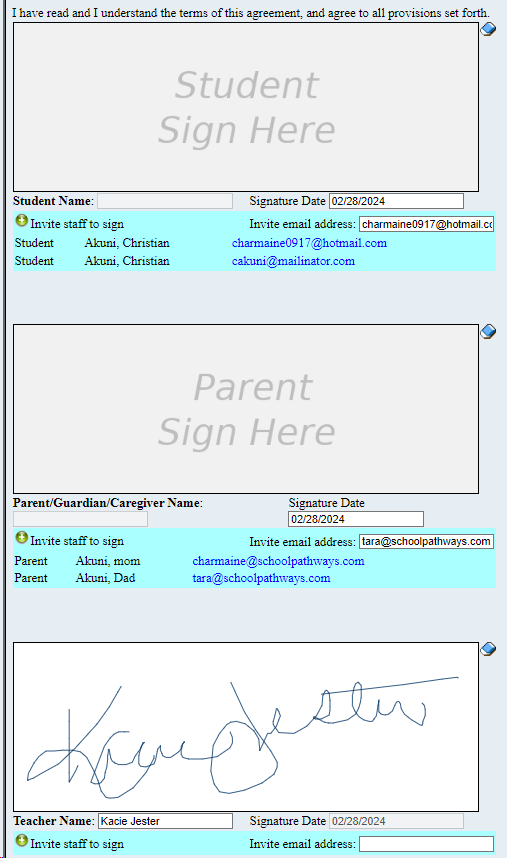
For signature collection, you can invite signers via email or, if they are present, complete the document on-site.
-
Email Invitation:
- Enable the auto-populate email invitation feature by going to Admin > Settings > Policies > Archiving > auto_populate_email_invitations. This setting will automatically populate the Invite Email Address field with the name and email information from your system, streamlining the invitation process.

- In each Invite Email Address field, review the pre-populated information or manually enter the correct email if needed.
- Enable the auto-populate email invitation feature by going to Admin > Settings > Policies > Archiving > auto_populate_email_invitations. This setting will automatically populate the Invite Email Address field with the name and email information from your system, streamlining the invitation process.
- In-Person Signature:
-
-
Click in each signature box (e.g., Teacher Sign Here) and sign directly. Use the eraser tool if corrections are needed.In-Person Signature:
-
E-Signature Option: If enabled, this feature allows users to type their names for a digital signature. This option appears only for the logged-in user.
-
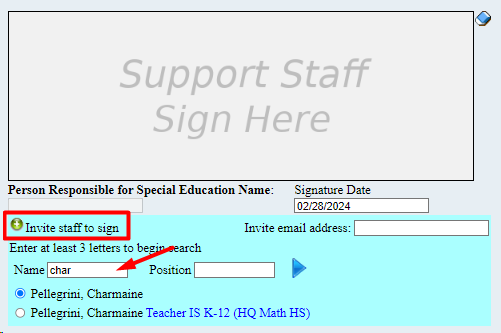
Additional Staff Signatures: Use the additional staff signature fields to invite team members (e.g., SPED, Counseling) as needed. Invitations can be sent via email, or you can search by name/position if an email is unavailable.
-
Complete any required acknowledgments and responsibilities. When ready, click Send Invitation(s) / Submit Agreement to confirm and send.
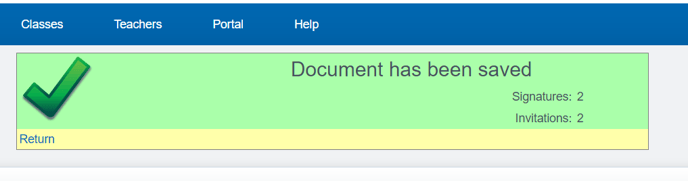
Confirmation: After submission, you’ll receive a summary of collected signatures and invitations sent. Recipients will receive a “Click Here to Sign” link to complete their signature electronically.
Finalizing and Archiving the Master Agreement
After all signatures are gathered:
- The teacher will receive an email notification with a link to Finalize the document. Alternatively, this can be completed in Signed Documents Compliance if the email is not received.
- Review the completed document for all necessary signatures.
- Click Submit Agreement to finalize.
The document will then move to the Archive Compliance area, pending approval by the designated administrator.
Troubleshooting Tips
- Missing Invitation Email: If the recipient does not see the email, they should check Spam or Clutter. Many email systems may filter these emails as spam, requiring recipients to mark them as “not spam” for future use.
- Missing Finalized Email: If the teacher does not receive a finalization email, they should check Spam or Clutter or finalize the document in Signed Documents Compliance.
Last Updated: 11/12/2024