
Table of Contents
Pre- Checklist: Make sure the items listed below are complete before creating a class
- School Calendars: Set School Calendar User Guide
- Graduation Types: Grad Types User Guide
- Registration Windows: Registration Windows User Guide
- Master Course list with available courses: Creating a Master Course List
Navigation:
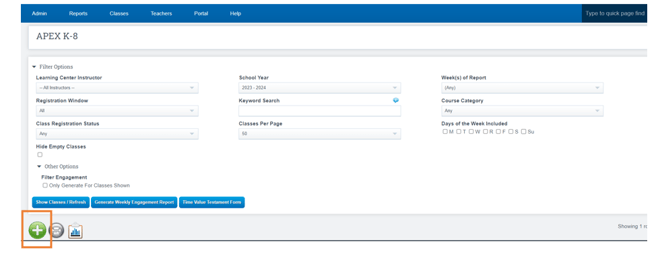
Go to Learning Centers (or renamed in your school) > Learning Center of choice > List Classes
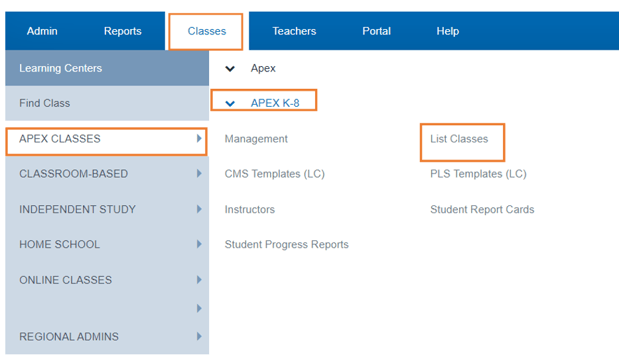
- Click the Green Plus Sign
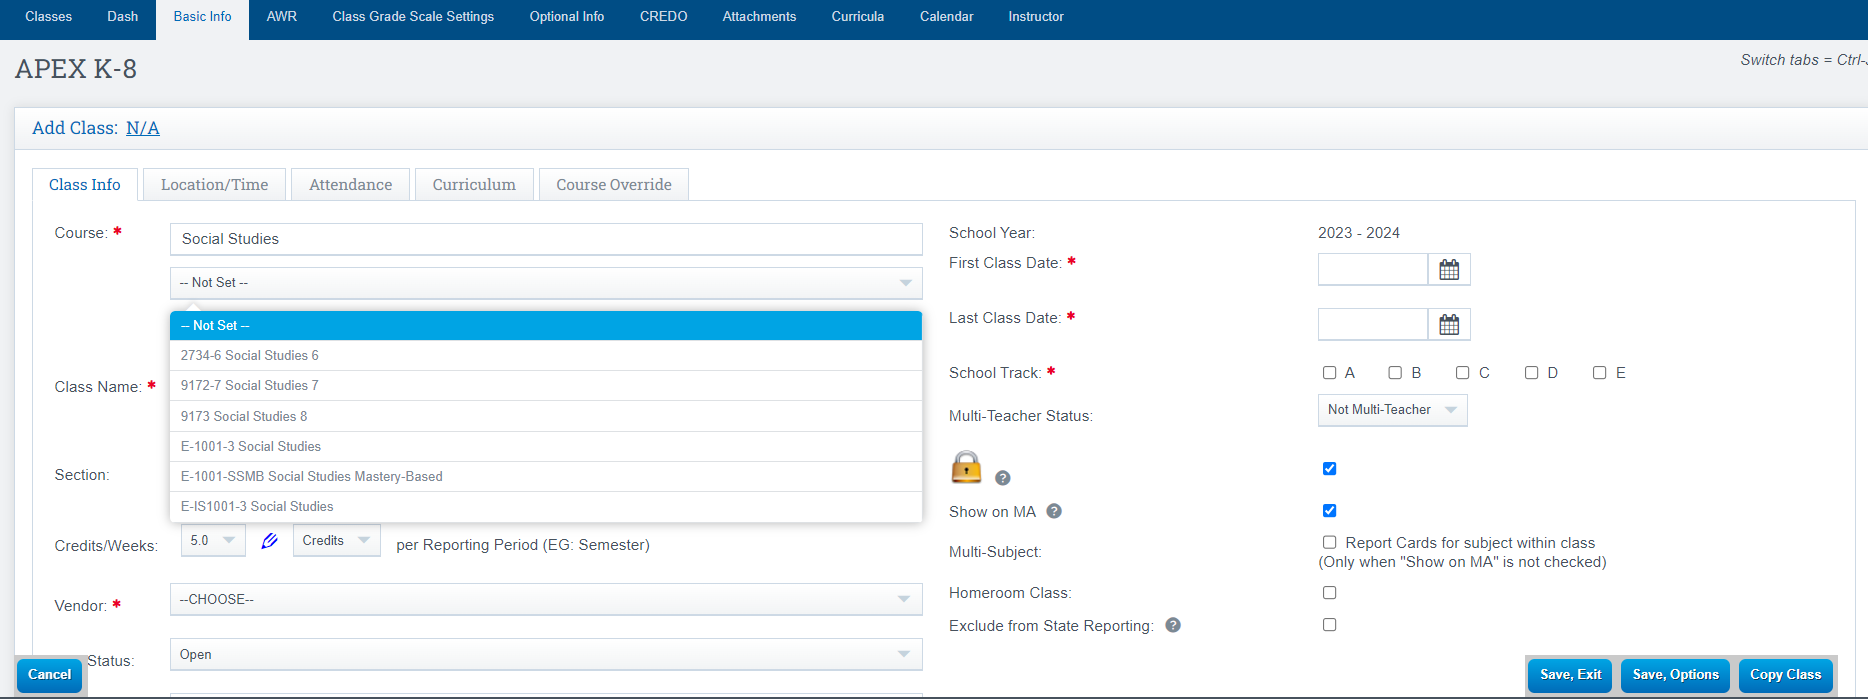
Class Info
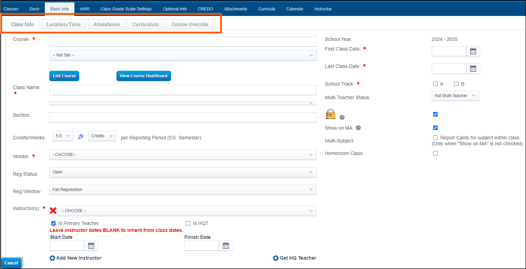
- Course: This pulls from the master course list for the school year on the list classes screen.
- Dropdown: Choose the Correct Name.
- Class Name: Choose from the list of available class names (this comes from the master course list as well). May default to the course name depending on the school settings
- Section: Needs to be unique. The section ID is pulled in various bridges and exports and can be important in other areas of the system.
- Vendor: If the school is using vendor provided services for classes and maintains a list in School Pathways, those can be selected here
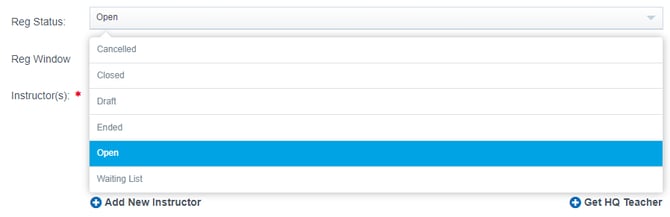
- Reg Status: Defaulted to "Open" but can be updated based on needs for that class.
- Reg Window: Ideally, if the school as Fall and Spring classes, they would have registration window for each. Recommended to choose the Registration Window that best corresponds with the class dates.
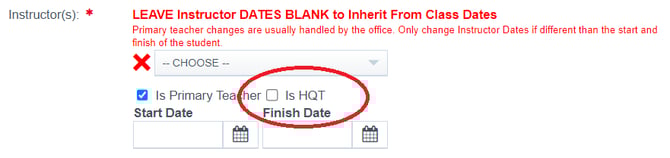
- Instructors: Location to designate the Primary Instructor, the HQT (if needed), and any other instructors who need grade/report card edit access to this CMS Class
- Primary: must have a primary on the class at all times. If a new primary takes over, end the current and add the start date of the very next day for the new (no skipping days)
- HQT: applies if the Primary of the class is NOT who should be reported to CALPADS. HQT typically indicates the credentialed instructor of the class (if not the Primary)
- First Class Date: Date the Class Starts
- Last Class Date: Date the Class Ends
- School Track: What track is the Class Offered (choose all that apply)
- Multi Teacher Status: Team Teaching or Job Sharing options
- Lock Box: Check this box so only the Primary or HQT can edit the grades on the Report Cards
- Show on MA: Checked, this class will show on the MA. Unchecked, the class will not be on the MA/IS Contract
- Homeroom Class: Checked indicates that this is a Homeroom class. DO NOT check if the school uses the PLS/Independent Study Teachers as this will prevent IS attendance and rostering
- Exclude from State Reporting- may not be visible to all users (policy driven), if checked, this class will not report to CALPADS
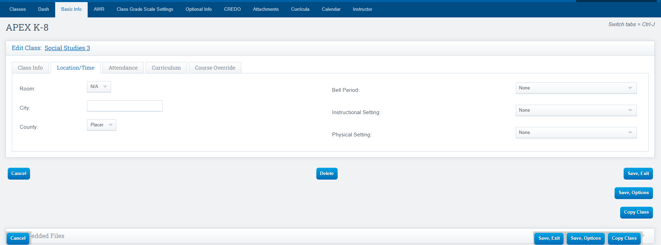
Location & Time Tab
- Setting up Room Numbers: Creating Room Numbers
- Setting up Bell Periods:
- Room numbers and bell periods come in handy when printing a student's class schedule
***Room Numbers are important for the Meal Time Export bridge
Attendance Tab
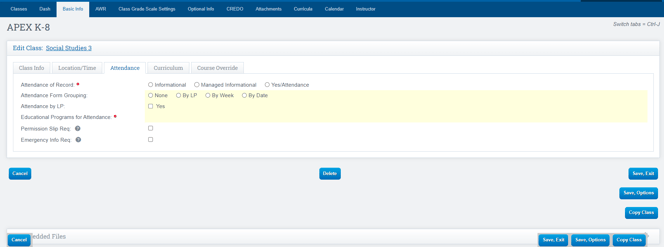
What type of attendance is being taken?
- Informational: Informational only, no ADA claims from student attendance in this class. The school likely takes ADA as Independent Study, or specifically takes ADA in a Homeroom class with all others marked informational.
- Managed Informational:
- Yes/Attendance: ADA- best used in schools where ADA attendance is taken within the CMS classes "Classroom Attendance" (not Independent Study)
- Clicking Yes/Attendance will expand some additional options to choose from- which attendance codes to be used

- Clicking Yes/Attendance will expand some additional options to choose from- which attendance codes to be used
Attendance Form Grouping: How do you want your teachers to view attendance when claiming? (Most common for just taking day to day attendance is "By Week" allowing teachers to print and sign attendace each week rather thank daily)
Attendance by LP: Check this box to prevent claims prior to the end of the LP. Not commonly used in Classroom based schools
Curriculum Tab
- Choose from any number of typed curricula. Alternatively, if your school is connected to a two-way integration, you may be able to choose from courses provided by that LMS.
This step is NOT required. The instructors of the CMS class can also set the curricula at a later date.
- If you are using a Curriculum Two Way Integration: see this guide here for greater detail
- Using the search options, search and select one or more text books
Course Override
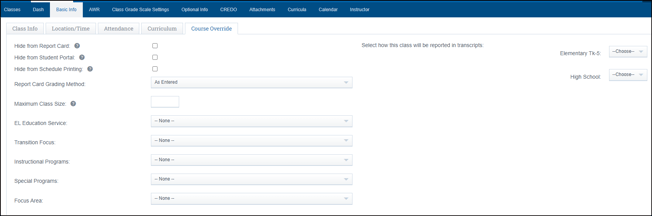
- Hide from Report Card: Choose whether or not this class shows on the report card
- Hide from Student Portal: Choose this to hide this class from the students' views in the portals
- Hide from Schedule Printing: Choose this to hide this class from the printed class schedules
- Report Card Grading Method: May be locked/greyed out based on school settings
- This pulls by default from the course settings
- Maximum Class Size: Allows setting a class size and all other students will be placed on a waiting list
- Note: If a user has higher permissions allowing Overfilling the Waitlist- they can overfill the class beyond the Max Class Size
- El Education Service: Set by default from course settings, can be overwritten here if needed
- Transition Focus: WIOA specific requirement
- Instructional Progress: WIOA Specific Requirement- can be defined in the course settings
- Special Programs: WIOA specific requirement
- Focus Area: WIOA specific requirement
- Reported in Transcripts: Set by default by course settings, but can be overwritten here if needed
Once finished, press SAVE.