
The Archive Compliance page allows administrators and teachers to view, upload, and manage student compliance documents in one centralized location. Users can filter reports by date range, school information, staff assignments, and compliance status to easily locate and review student documentation.
First Edit Report Requirements
Before utilizing Archive Compliance, it is important to configure your Report Requirements. This allows you to determine which compliance documents and reports are displayed within Archive Compliance.
Important: Configuring your report requirements is also an essential step if you intend to utilize the Approval Stack for reviewing and approving compliance documents.
Access Report Requirements
- Navigate to Admin > Archives > Archive Compliance or Teachers > Compliance > Archive Compliance.
- Select Edit/Add Requirements.
- Locate and select Edit Report Reqs to manage the reports available within Archive Compliance.
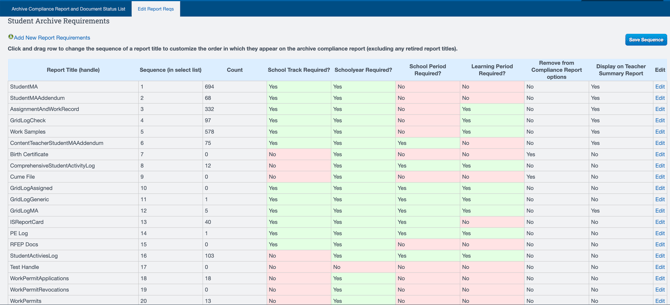
Understanding Report Column Information
The Report Requirements page displays the following columns, allowing you to customize how reports appear and function.
| Column | Description |
|---|---|
| Report Title | Displays the name of the report. |
| Sequence | Determines the order in which reports appear in the dropdown menu. |
| Count | Displays the total number of archived documents associated with the report. |
| School Track Required | Determines whether the School Track is required for the report. |
| School Year Required | Determines whether the School Year is required for the report. |
| School Period Required | Determines whether the School Period is required for the report. |
| Learning Period Required | Determines whether the Learning Period is required for the report. |
| Remove from Compliance Report | Allows you to remove a report from the available dropdown options in Archive Compliance. |
| Display on Teacher Summary Report | Determines whether the report is displayed on the Teacher Summary Report. |
| Edit | Allows you to modify the report's configuration and preferences. |
Add or Remove Report Requirements
- Select Edit Report Reqs.
- Review the available report requirements.
- Add or remove the reports you want displayed within Archive Compliance.
- Review and update the applicable report settings as needed.
- Save your changes.
Reminder: Report Requirements determine which documents are available for tracking within Archive Compliance. Be sure to configure the appropriate requirements before uploading documents or utilizing the Approval Stack.
Once your report requirements have been configured, return to the Archive Compliance page to begin generating and reviewing your compliance reports.
Utilizing the Archive Compliance
Step 1: Navigate to Archive Compliance
Depending on your role, navigate to:
- Administrators: Admin > Archives > Archive Compliance
- Teachers: Teachers > Compliance > Archive Compliance
Once on the Archive Compliance page, you will see two reporting options:
- Archive Compliance Report
- Document Status List
You will also see an Edit/Add Requirements option, which allows authorized users to manage compliance document requirements.
Step 2: Select Your Report Filters
Before generating your report, review the available filters to narrow down the information displayed.
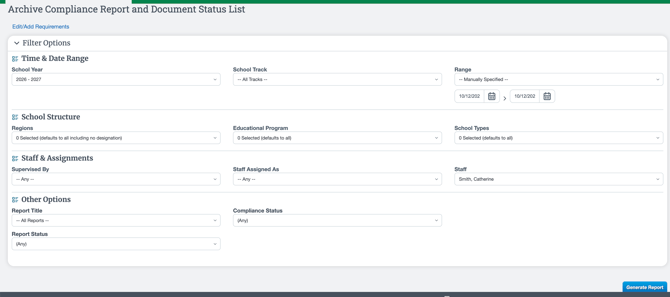
Time & Date Range
- School Year
- School Track
- Range
Important: Pay close attention to the selected date range when uploading or viewing specific compliance documents, such as Master Agreements or Work Samples. The date range determines which records and associated school year information appear in your report.
School Structure
- Regions
- Educational Program
- School Types
Staff & Assignments
- Supervised By
- Staff Assigned As
- Staff
Other Options
- Report Title
- Report Status
- Compliance Status
Administrator Tip: To narrow down your results, consider filtering by a specific Report Title or Staff Member.
Once your filters have been selected, click Generate Report.
Step 3: Review the Archive Compliance Report
After generating the report, you will see the compliance information organized by staff member and report title.
- Teachers: Your name will appear at the top of the report.
- Administrators: The assigned staff member's name will appear at the top, followed by the report title.
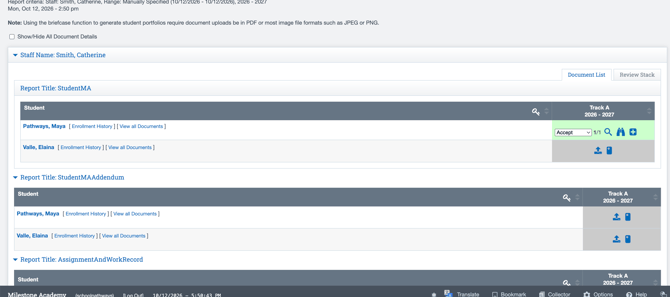
Below the report heading, you will see the students included in the selected report.
For each student, you have the following options:
- View Enrollment History: Review the student's enrollment records and history.
- View All Documents: Access all documents that have been archived for the student.
On the right-hand side of the report, you will see the School Year and School Track, based on the date range selected when generating the report.
Step 4: Understand Document Statuses
Each student's compliance documents will display a status indicating whether documentation has been uploaded or approved.
-
Unapproved Documents
-
Accept
-
Skip
-
Reject
If a document has not yet been uploaded, the corresponding box will appear gray.
Within the gray box, you will see two upload options:
- Upload File: Upload a document directly from your computer.
- Upload from Mobile Device: Upload documentation using a mobile device.
Step 5: Upload Compliance Documents
To upload a missing compliance document:
- Locate the student and the corresponding document requirement.
- Identify the gray box indicating that no document has been uploaded.
- Select the Upload File icon to upload a document from your computer, or select the Mobile Device icon to upload using your phone.
- Follow the prompts to complete the upload.
- Review the document's status within the Archive Compliance Report.
Uploading from a Mobile Device or QR Code
Archive Compliance also supports uploading documents from a mobile device using a QR code.
For detailed instructions, refer to our Knowledge Base article:
Uploading Work Samples via QR Code
Additional Tips
- Always verify your date range before generating the report or uploading documents.
- Administrators can use the Staff and Report Title filters to review specific compliance requirements.
- Use View All Documents to review a student's previously archived documentation.
- Check for Unapproved documents that may still require review.
- Use the Document Status List reporting option when reviewing document statuses.
Approval Stack
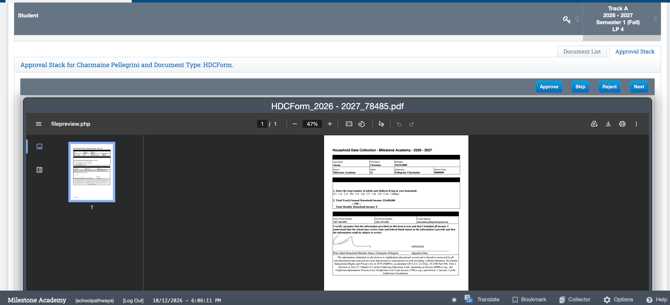
The Approval Stack allows administrators to quickly review and approve compliance documents that are awaiting approval, streamlining the document review process.
At the top of each report, you may see an Approval Stack option if there are documents pending approval.
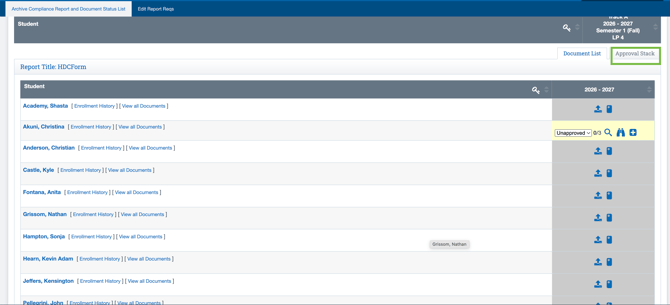
- Select Approval Stack to view documents awaiting review.
- Review the uploaded document to determine whether it meets the compliance requirements.
- Select the appropriate action:
- Approve: Approve the document.
- Skip: Skip the current document without making an approval decision.
- Reject: Reject the document if it does not meet the requirements.
- Next: Move to the next document awaiting approval.
- Continue reviewing documents until you have completed the necessary approvals.
Reminder: Ensure your Report Requirements have been properly configured to utilize the Approval Stack effectively.
Review Stack
Once documents have been approved, the Approval Stack for the corresponding Report Title will change to a Review Stack.
The Review Stack allows you to quickly navigate through previously approved documents without having to open each student's record individually.
Use the Next and Previous buttons to move between documents, making it easy to review archived documentation efficiently.