
Defining School Tracks
Please be aware that if your school operates with a single calendar, no modifications are necessary in this section.
Admin>Settings>School Calendars

Select the link labeled "Set/Define School Tracks" or the "Tracks" tab.

Select the "Add New Track" button.
To prevent new enrollments from using the new track, simply check the designated box.
Click the "Save Changes" button.
After clicking the save button, you will return to the previous page, where you have the option to add additional tracks if necessary. Please note that only one track can be added at a time.
Define School Calendar Dates:
Admin>Settings>School Calendars
Select the "Set School Calendar for a School Year" link or the "Calendar Days" tab.

Select the desired school year and track from the provided drop down menu then click the "Set Year Details" button.

IMPORTANT: If the school year you wish to edit is not listed in the selection (for example, if it is a future school year), you will need to add that year by following the steps outlined below:
Admin>Settings>School Calendars
Select the "Lookup/Manage School Years" link.

Enter the first part of the school year in the provided text box. Example: for the 2025-2026 school year you would enter "2025" as shown below. Click the "Create" button.

To establish your school calendar dates, begin by accessing the Set School Calendar page as mentioned in the previous section. From there, input the dates for both the first and last day of school and click the "Save Above Details" button.

* Entering P1, P2, or YE dates are optional fields that allow you to lock down the ability for teachers to adjust attendance claims after the cutoff date; it is not necessary to add these dates upon initial setup.
Next select the "Define Dates" button.

Scroll to the bottom of the page and check the “Set all unchecked days to Normal Schooldays” check box. This will auto-fill all days to normal school days or ada days.
They type of day can be adjusted by clicking the box for the calendar date until the type of day (indicated by color key) is selected.


Defining Learning Periods
After you have finished setting up the School Calendar, locate and click the "Update Learning Periods" tab that will appear in the bottom right corner of your screen.

You can also access this page by using this alternative path:
Admin>Settings>School Calendars
Select the "Set Schoolwide Learning Periods" link or click the "Learning Periods" Tab.

From the dropdown menu, choose the desired school year and track for which you want to establish Learning Periods, then click the "Next" button.

- Input the start and end dates for each learning period in the approved format mm/dd/yyyy either by typing them directly into the designated text boxes or by selecting the dates using the calendar icon.
- As you input the start and end dates for each learning period, the calendar image on the right will visually highlight the corresponding dates for each selected Learning Period.
- Please be aware that if you overlook any school days, a red alert will appear. You will be unable to save your Learning Period selections until all school days are properly accounted for.
- Once all school days are accounted for click the "Save above Learning Periods" button.


Defining Reporting Periods
Admin>Settings>School Calendars
Select the "Set Reporting Periods" link or click the "Reporting Periods" tab.
Select the desired school year and track from the provided drop down menu and click the "Edit" button.

Choose the desired Reporting Period from the drop down menu on the right then select the first and last day of the reporting period one your calendar. Once you have made your selections click the "Confirm" button to save.
Repeat this process for any additional reporting periods needed.

Sub-Periods: If you would like to set up sub-periods underneath your reporting periods such as quarters, progress report periods, etc. select the reporting period where the sub-period is needed then click the "Set Sub-Periods" button.

Select the desired sub-period from the drop down menu and enter the start and finish dates using the format of mm/dd/yyyy or by using the calendar icon then click the "Save" button.
- You may enter as many sub-periods under the parent reporting period as needed however the date ranges should not overlap.
- Sub-Period dates should fall within the parent reporting period date range.
- Remember to navigate back to the Set Reporting Periods page in order to add sub-periods to a different parent reporting period.

Defining Bell Periods
Admin>Settings>School Calendars
Click on Bell Periods tab.

Select the desired school year and then click "Update".
Select the "Edit Bell Periods" Link.

Click the Green + Icon to add a bell period. This will allow you to define a period; you can repeat this process until you have added all needed periods then click the "Save" button. To remove any unnecessary periods, simply click on the Red X Icon.

Once your bell periods have been defined click the "Add Bell Schedule" link.

Input the desired schedule name and the start and finish times for each period then click the "Save" button.

Transcript Settings
Set Transcript Credit Requirements
Transcripts settings play a crucial role in determining various aspects such as credit requirements, grade weights, course modifiers, and GPA types, as well as the procedures for posting grades.
Admin»Settings >Transcripts/Report Cards

Select the "Set Transcripts Credit Requirements" link from the menu or click the "Credits" tab.

Your initial school types will be input by a School Pathways representative during your onboarding process. However, if at any time you need to add additional school types you can do so by following the below steps.
Select the "Add a New School Type" link.
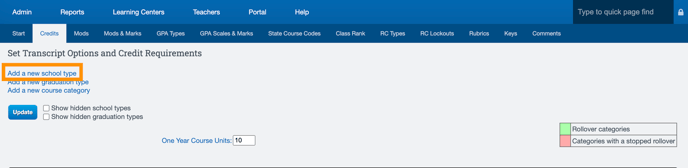

*Upon saving a new school type a new “General Education” graduation type will be auto created.
Select the “Add a new course category” link then enter a category name and Click SAVE 
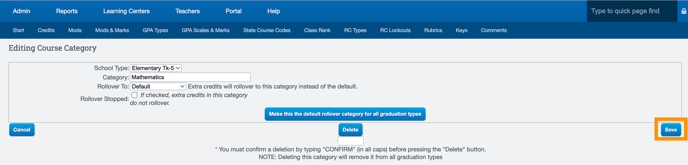
*By selecting the "Make this the rollover category for all graduation types" option, you will designate this category as the default rollover category for all graduation types, which will be indicated by a green highlight.
In order to set the number of credits required for each course category enter the amount of required credits and click the "Set" button.

Program Options
Admin» Settings» Program Options
Programs are associated with student enrollment records, and several default programs are already available for your use. If you require more detailed tracking, you have the option to create custom programs.
Below are the steps to set up a program for your school. When configuring a program, consider whether it will be linked to Average Daily Attendance (ADA) or if it will serve merely for general information and student tracking.
Click the "Add" button to create a new program option.

Input a name for the program, such as "Pre-Enroll" or "Tutoring."
Please note that program options are not intended for Special Program enrollments, which include categories such as Special Education, 504 plans, English Learner (EL) programs, or Free/Reduced Lunch programs.
Click the "Save" button.
Setting District Information
It is essential to input fundamental information about your school, such as the address and phone numbers. Additionally, you must include your 14-digit CDE code.
Step 1. Admin»Settings»School Information
Step 2. Please provide the school name, CDS Code, address, and phone number. All other fields are optional. Additionally, there is a new field available for entering an optional CEEB Code.
Step 3. Click the "Save" button.

Identifying and Customizing Special Enrollment Programs
Admin>Settings>Special Program Enrollment Options
Special Program Enrollments are linked to student enrollment records, making it essential to choose any programs you wish to use for tracking student participation. Additionally, you have the option to create new custom programs, which can facilitate the enrollment of students in various initiatives, such as tutoring, after-school activities, or transportation services like bus routes.

Please note that creating a special program enrollment for the following programs is not necessary for their inclusion in CALPADS extracts, as the system has specific sections dedicated to tracking this information.
- Free/Reduced Lunch
- Special Education (Reported from SPED system not SIS)
- Homeless
- Foster (not reported from SIS)
- 504
- Gate Eligible
- Migrant Ed