
Table of Contents
- Step 1: Configure Learning Center Master Agreement Settings
- Step 2: Access the Mass Print Tool
- Step 3: Configure the Mass Print Filters
- Step 4: Generate and Output the Master Agreements
Step 1: Configure Learning Center Master Agreement Settings
Before using the Mass Print feature, each Learning Center must be configured with the correct default Master Agreement settings. This ensures that agreements pull the appropriate data when printed in bulk.
Navigation:
Learning Centers > Area > Learning Center > Management
Click: #2 Edit Learning Center Master Agreement Settings
For Legacy Master Agreements
-
Set default values for the following fields:
-
Assignments
-
Meeting Information
-
Methods of Study
-
Other Options
-
Parent/Guardian Progress Communication
-
Tiered Reengagement Strategies
-
Assignment (do not enter Grade Level Override
-

-
Click SAVE

-
You will be redirected to the Learning Center Settings page.
-
Scroll down and check the box:
-
“Allow overriding school default settings with Learning Center default settings for Master Agreements”

-
For Custom Master Agreement Templates
-
Under #2 Edit LC MA Settings, locate the MA Template dropdown.
-
Select your preferred Master Agreement Template.
-
Click SAVE.
-
Ensure the override checkbox is enabled:
-
“Allow overriding school default settings with Learning Center default settings for Master Agreements”

-
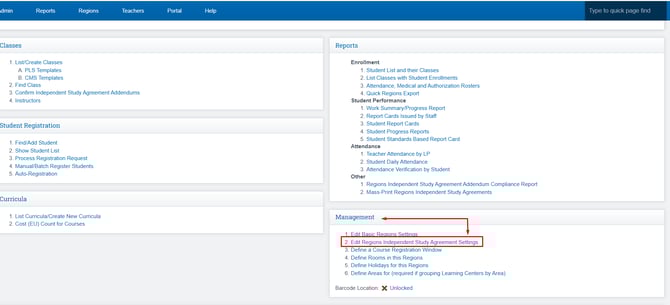
Step 2: Access the Mass-Print Master Agreements Section
Once your Learning Center settings are configured, follow the steps below to reach the Mass Print tool.
Navigation:
Teacher Pages > PLS > Student Roster
-
Locate the student list.
-
Click the blue arrow beside any student’s name to expand their profile.
-
Navigate to the Reports tab.

-
Click on the Reports link to open, then on the screen, select Mass-Print Master Agreements.

Step 3: Configure the Mass-Print Filters
You will now set the filters that determine which documents are generated and how they are formatted.
- Report Type: Select “Master Agreement” or “MA Addendum”
- School Track: Choose the appropriate school track
- Show Students In: Define any grouping conditions
- School Year: Select the correct school year
- School Period: Choose the desired reporting periods
- Start Date / Finish Date: Define the document’s active date range
- Teacher: Select the teacher responsible for the students
- Select Students: Use checkboxes or filters to select specific students

Note: Fields like “Show Report Periods” and “Time Period” may be visible depending on your setup but are not always required.
Step 4: Generate and Output the Master Agreements
Once filters are selected:
-
Click Preview Selected Independent Study Agreements

- Before generating, ensure the following box is checked to apply your Learning Center's MA defaults: “Force using LC setting”

This ensures that the system overrides school-level settings with the Learning Center’s values when generating agreements.
- From the preview screen, choose whether to:
-
-
Print — to generate and download the MAs in PDF format
-
Archive — to send out for signature digitally

-