
Items that will be covered in this Guide:
- Setting School Calendars
- Learning Periods
- Bell Periods
- Transcript Settings
Learning Periods
- For Attendance Accounting
- Calendar Month typically
- For Grading/Progress Reports/Semester Grades
- Matches school progress report and semester grading periods typically
Setting School Calendars
Set/Define School Tracks
If you are only using one calendar for your entire school, you do not have to change anything in this section.
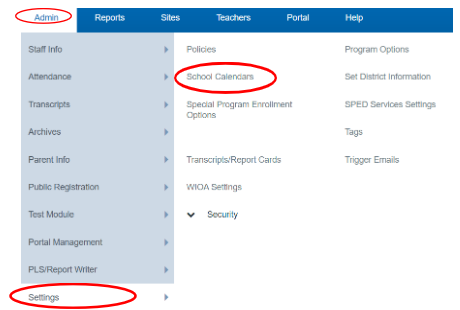
Admin>Settings>School Calendars
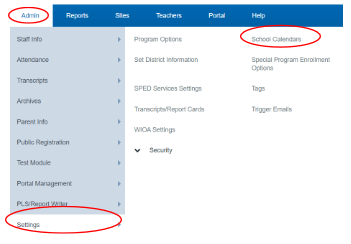
Click either the Set/Define School Tracks link or the Tracks tab

Click Add New Track (Bottom Right Corner)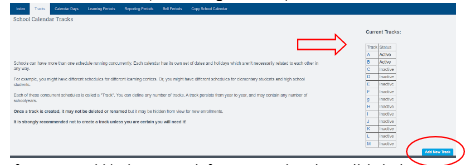
If you want to hide the new track from new registrations, click the box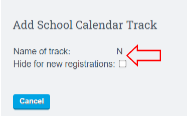
Click Save Changes
*Once the save button is clicked you are brought back to the previous page where you can add more tracks if needed (only one track can be added at a time)
Set School Calendar for a School Year
Go to Admin>Settings>School Calendars
Click on the Calendar Days tab at the top
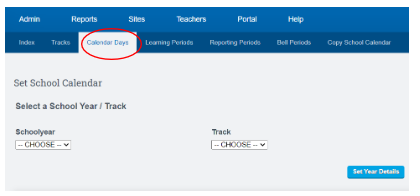
Click the Dropdown to Choose Calendar Year
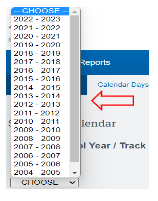
Click Track Dropdown to Choose the Correct Track /Click Set Year Details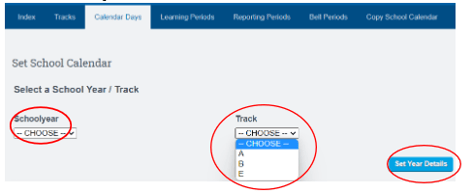
Enter the dates for the first and last day of school
* Entering P1, P2, or YE dates are not necessary at this time and should not be set until the date passes and you are ready to report your attendance for this time frame
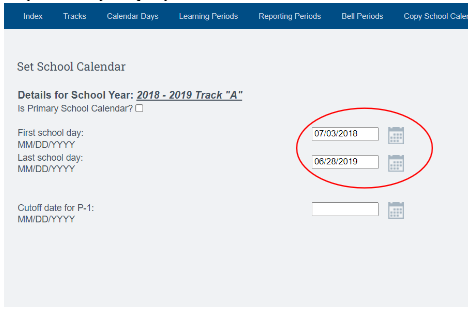
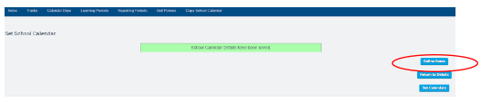
Click Save Above Details

Click Define Dates
Click inside a blue box to change color to code for different categories (Holidays, Emergency days, ACA days, etc.
Click Make this calendar to Active, if you are ready for the calendar to be active
Check “Set all unchecked days to Normal School day” check box. This will auto-fill all days to normal
schedule
Click Save
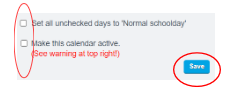
* Calendar has to be active prior to putting in reporting periods
*You will get a warning message if you have less than 175 days in your calendar
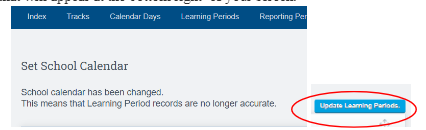
Set Schoolwide Learning Periods
Once you have completed “Set School Calendar” You need to click “Update Learning Periods” tab that will appear at the bottom right of your screen.
* If you are logging in to make updates from your dashboard follow the route below
Admin>Settings>School Calendars
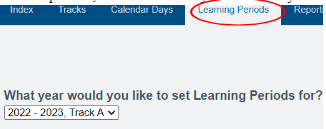
Click the Learning Periods Tab on Toolbar
In the drop down, select the school year and track you want to set Learning Periods for and click Next
Click the Update Learning Periods
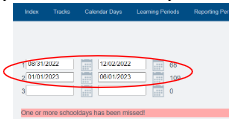
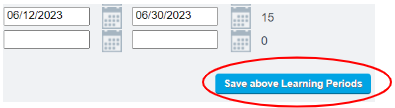
*You will see boxes to start entering your beginning and ending dates for each Learning Period.
*As you enter the dates, they will change to another color on the calendar on the right side of your screen
* If you skip dates, you will see a red alert above the Save above Learning Periods button. In addition, you will not be able to save your LPs if you are missing a school day
* Enter dates by clicking on the calendar icon or by entering in the following
format: mm/dd/yyyy
Click Save above Learning Periods
Set Reporting Periods
Admin>Settings>School Calendars
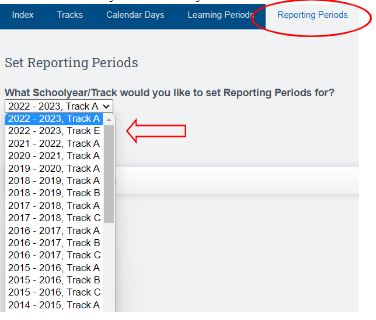
Click Reporting Periods in the top toolbar
Choose the school year and track you want to work in and click Edit
Click on the first and last day of the first reporting period in your calendar
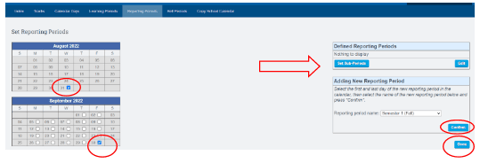
On the right side-lower box you will see “Adding a New Reporting Period”
*Most common answers for that dropdown are:SEMESTER, TRIMESTER, SESSION, QUARTER
- Click Confirm to save your choice. You will see what you saved in the above box
- Continue this process to set all reporting periods, then click Done
Sub Periods: If you use progress reports, they need to be defined as Sub Periods in your School Calendar
Set Bell Periods (Optional not used for PLS) left off here
Admin>Settings>School Calendars
Click on Bell Periods tab at the top of the page

Choose the school year you want to create bell periods for and then click Update
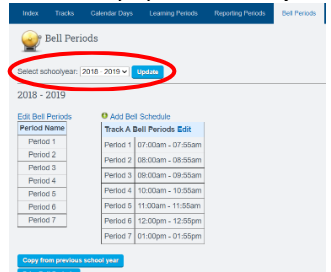
Click the Green Plus Button. This will create an empty field where you can enter the name of the bell period. Click Save once complete
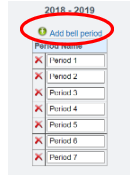
*You can move the periods around by clicking on the green
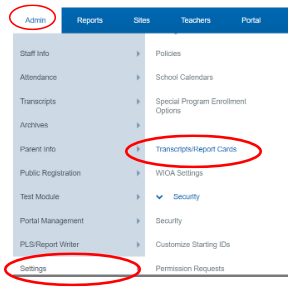
Transcript Settings
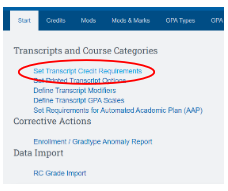
Set Transcript Credit Requirements
There may have been changes to the Transcripts Settings that will give each school the ability to set up transcripts to match the school’s needs. Transcripts settings affect everything from credit requirements, grade weights, course modifiers and GPA types to how grades can be posted in PLS and Learning Centers.
Admin»Setting >Transcripts/Report Cards
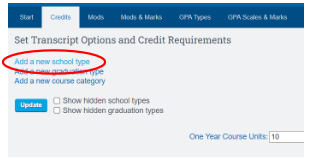
Click on Set Transcripts Credit Requirements
Click Add a new school type
* If you need to create a new graduation type, click the “Add new graduation type” link.
*Type in the name of the new graduation type (ex: College Prep Education) . Do not forget to set the rollover category.
Name your school type, choose the grade levels, report card template, and select if you want to calculate credits for this type
Click Save
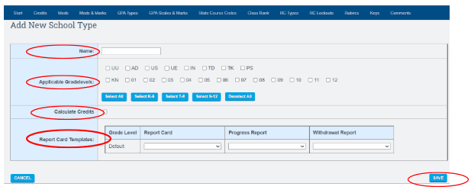
*This will automatically create a “General Education” graduation type under your new school type
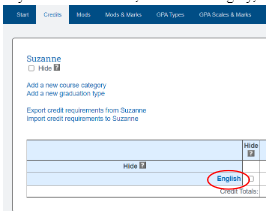
Click “Add a new course category” Enter a category name and Click SAVE
*Repeat Step 5 until you have all categories entered
*Selecting the “Make this the rollover category” for all graduation types, rollover category will be highlighted in green
If you make a mistake, click on a category, such as English, and edit or delete the course category
Click the Credits Tab on toolbar
Click Electives category
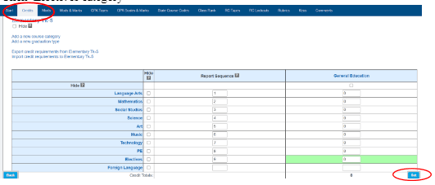
* You can edit or delete the course categories and add new graduation types if needed. Click on the name of the course category if you need to edit or delete it. All deletes in requires typing CONFIRM in all caps and clicking on the DELETE button to edit the credits needed in a category, just change the number of credits in the boxes and click SET
Enter the credits required for each course type and click SET
Set Printed Transcript Options
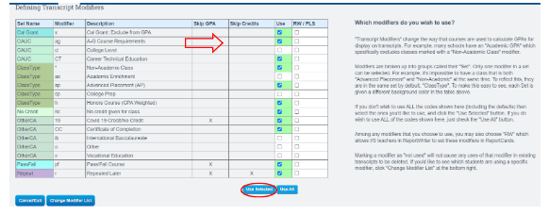
Choose Define Transcript Modifiers
Determine what optional information will be included in students’ printed transcripts MODS Tab
Click Mods on your Toolbar
Choose what modifiers you want to be used on your transcripts
*If you would like to add modifiers to the list, click on CHANGE MODIFIER LIST

Example: students might have courses that will not be taken for credit. Click Add and enter “nc” and “course not taken for credit”
in the fields. Change the Modifier set to read
“**Create New Set Called” and then enter your own name in the blank field
You can also choose the ‘Skip GPA’ calculation and “Skip Credits” calculation for any courses set with this modifier
Save
OR
Click Cancel/Done to return to the main page
Now choose where you want to allow this modifier. The USE column indicates what is on or off in the SIS. Choosing RW/PLS allows teachers to use it as a modifier in PLS
Click Use Selected
Click Mods and Marks Tab 
Above is a list of all the class marks that are acceptable for transcripts, and a list of the modifier sets. You may want to set things so that certain marks cannot be used with certain modifier sets.
*For example, you might decide that pass/fail classes can only be given a mark of “p” (pass) or “f” (fail), and that “p” may not be used unless the Pass Fail modifier (pf) has been selected for that class.
Click on the GPA Types tab in the toolbar
Here you see the types of GPAs that are being calculated on your transcripts. You can change these definitions and/or create new GPA type definitions for your transcripts
Click SAVE when you have completed this page
- Set the GPA types for your school (if you need to add more click on Add New Type)
- Choose if you want a class rank to be calculated using this GPA. You must choose one and then click Save Class Rank/Default Scales. If you want another GPA type calculated for Class Rank, choose a new one and then click Save Class Rank/Default Scales again.
- Choose if you want the GPA to be calculated on an un-weighted or weighted scale. Unless you want all grade types to have a boost (5.0 Scales instead of 4.0) leave this unweighted
- Click on “More Details” and choose what grade levels this particular GPA type includes for calculation. The “Default” sets the grading scale to whatever you did in step 3 (usually unweighted.) Notice that the Pass/Fail grade type is not added into the GPA calculation and the honors and AP are given an extra point.
Click GPA Scales & Marks
*The Transcript GPA Scales are the marks you want to allow for classes and how much value should they have
Enter in values you’d like to have for the GPA scales used for computing GPAs in transcripts for the various marks. If you don’t wish to use a particular mark in your transcripts, leave the entry box blank
You may add your own marks if you aren’t satisfied with what you see here. To delete a mark, you must type “CONFIRM” in all caps to complete the removal.
SAVE all changes
Choose Class Rank Tab (this is optional)
- Every night, the class rank for all students with transcripts is calculated
*This page shows the student name, the calculated GPA, the grade level, the class rank, and the date it was calculated
- If there are errors in your student’s transcripts (because an entry was made erroneously), you will get an error report at the bottom of the page
Program Options
Admin» Settings» Program Options
This allows you to set any program you want to enroll your students in. Examples might be tutoring groups, groups that meet once every week, or groups that are enrolled in a special class that you need to get a specialized roster for. Once these are set, a student can be enrolled in the program from the student enrollment page.
The following shows how to create a program for your school. When setting up a program, decide if it will be connected to ADA or just for general information and tracking of students.
Click Add
Enter the name of the Program. For example: Preenroll, Tutoring, etc.
* Program options should not be used for Special Program enrollments such as Special Education, 504, EL, or Free/Reduced Lunch programs.
Click SAVE
Setting District Information
Basic information about your school including address and phone numbers, must be entered. This includes your 14-digit CDE code.
Step 1. Admin»Settings»Set District Information

Step 2. Enter all information: Name, CDS Code, Address, etc.
Step 3. SAVE