How to Upload an IEP File into Student Notes
Many schools desire to have a Student’s IEP File loaded into the SIS so teachers who offer instruction to the student can access that IEP. The following are the steps to upload and protect this file appropriately.
Each Instructional Stakeholder will need to be enrolled in a new permission group titled

This group allows instructional stakeholders access to a student’s IEP file and/or 504 plan for as long at the instructor is attached to the student. Once this association ends however, access also ends.
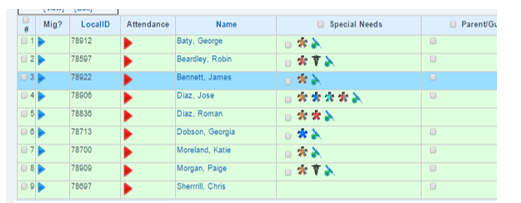
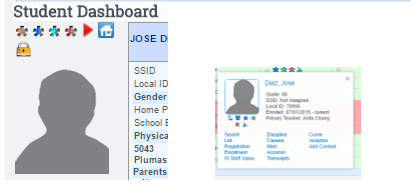
Access an IEP file or a 504 plan via the icons on the Student Dashboard, the PLS Student Roster or even the Student Quick View …

You will only be able to see IEP files from the SPED page and 504 plans from the 504 page in the SIS. So if someone is looking at the Student Note Summary from the Student Dashboard, they can see that specialized notes exist, but they will not be able to access the except by Clicking in via the icon.


Step 1.
A SPED Coordinator should initially be responsible for uploading the IEP for a student, they must be a Root User in order to complete this task.
Click into the SPED tab for the appropriate student, then click go to the bottom left of the page
Click on the pencil to add a Student Note
Click on the green ‘+’ icon

Question: Who can upload IEP Files and 504 Plans?
Answer: Only a Root Administrator can upload these documents, change them, or delete them.
Question: How does a Root Administrator upload the files to the SPED or 504 area?
Answer: First, go to the SPED or 504 page itself and click to add a ‘Student Note’
Step 2.
On the next page,
-
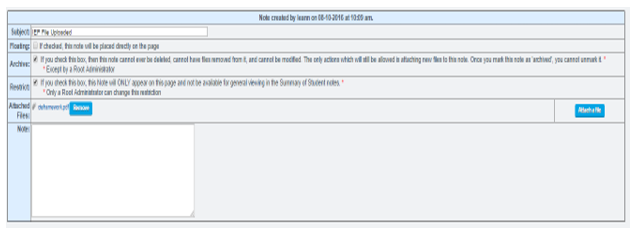
Title your note [i.e. STUDENT IEP FILE].
-
Next, click on the ‘Attach a file’ button and attach the IEP file from your computer.
-
Important: Finish your note by being sure to check both the “Archive” and “Restrict” boxes. This keeps the IEP file restricted to only those teachers who are working with the student and should have access to the SPED tab.
-
Add any additional info desired in the actual Note area and click the “Add” button

FAQs
Question: I am the SPED Coordinator who originally uploaded the Student’s IEP file. It has now been updated. How do I replace/update the note with the new data?
Answer: Once you have saved the updated IEP to your computer, you re-enter the original note and simply “Attach a file” and it will automatically replace the original file with the new IEP file.
Question: If I am on the Student Dashboard, can I tell if there is a Student IEP file in existence by looking at the Student Note Summary there?
Answer: Yes, you can see that there is a note such as “Student’s IEP” but you cannot click in or read that note unless you have permission to the page the note was left on.
Question: Once a teacher no longer has a class with a SPED student, will they still have access to that student’s IEP file?
Answer: No. As soon as the class or the instructional relationship ends, the teacher is automatically restricted from having access to that student’s SPED tab.
Question: If I need to update the student’s IEP because we have just had a scheduled IEP meeting, how do I update the IEP file in the Student Notes?
Answer: You can either upload the updated IEP file (which will over-write the previous IEP file if it has the same name) or you can just make a new note in the SPED Student Notes with whatever changed during the most recent IEP meeting. The choice of how to handle this is up to you.
