
For District Level Security Settings- see this guide: Security Settings- District Level
Navigation

Definitions
A. List of publicly Available Pages – shows a complete list of pages parents and students can access through the portal or REG-Online.
B. Deletion Log – Searches for records that were deleted per username, IP address, page, and any other information available.
C. Student Login Letters - Creates a list of students and passwords using various sort functions. See this page for more information.
D. Parent Login Letters – Creates a list of parents in system with various sort functions, the students that are linked to them, and their password. See this page for more information.
E. Staff Login Letters- Creates a list of staff in the system with various sort functions, that staff that are linked to them and their password.
F. Define Security Groups - List of default security groups and the ability to make customized security groups. (See the Define Security Groups section below)]
G. Security Elements By Date- An audit and configuration log that lets administrators track or adjust how user permissions and access have changed over time.
H. Define Users – shows individual users, their username, password and permission groups set. See the Define Users section below
Detailed explanations of Areas F and H
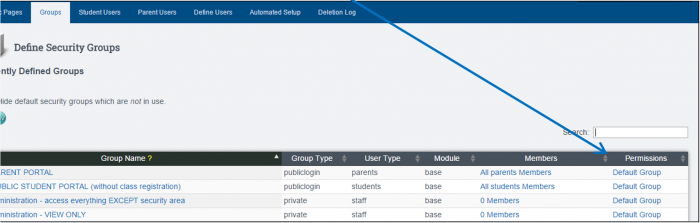
F: Define Security Groups
Security groups are labeled with a common name that describes a user type. For example, the user group “Attendance Administrator” would be the person at the school who needs to access the areas of the SIS that have to do with attendance. There might be one or several people who are “members” or belong to the same group. The group is already set with all the permissions required. As another example, for the group “Teachers-Classroom Instructors,”all required permissions that a teacher would need to perform their basic duties are included in this group. All classroom teachers would need to be added to this group as “members” so they can do their job without interruption.
A “default” security group is created by School Pathways. Schools cannot change these groups. You can only enroll members. If a group is not set to your needs, you can create your own group by doing the following:
-
Step 1. Add a new Permission Group, or use the ones already created.
-
Click Add New Group button.
-
Add a new title for the group
-
Set the Group Type: most should be set to private so only school employees can use it
-
Set the User type: typically Staff

-
-
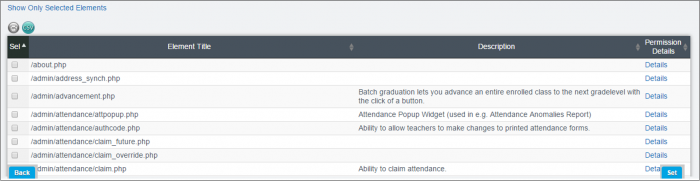
Step 2. Set the permissions for the group. Find your group in the alphabetical listing and click on “Set Permissions”. The permission groups with “Default Group” in the permissions column cannot be changed.
In this page view, the Element Titles are listed in the left column. In some instances, a definition of the page is in the right column.-
Click the Details link to view a list of users who currently have permissions to access the page.
-
Check the boxes on the left if you want to include the page in this group and click SET. You are taken back to the main list of Permission Groups.
-
-
Step 3. Choose Members. Parents and Students are auto-enrolled into their groups for access to the portal– Even if you do not use it. To add staff members, click on the word Members

- Choose a member on the right and SAVE CHANGES to move to the left. When members are on the left side of the page, they are IN the group. If you want to remove them from the group,
- Check their name on the left and then click SAVE CHANGES. Columns can be sorted by clicking on the column title.

H: Define Users
Users must be added to the system and linked to their registration record. Student and parent records will automatically link to the user name but staff members must be manually linked.
Current staff accounts that are linked will show in the Define Users area. If you need to view the unlinked accounts or disabled accounts, change the settings at the top left of the page and click UPDATE.

In the above view,
-
Clicking on the login name link shows the current username and password. If the username and password are not shown, you can click the EDIT LINKED TO button and choose a staff member to link the login to.
-
Access can also be set to expire or you can enter a disable date in this area to expire the staff member’s access to the SIS.
-
Clicking on the staff member’s name takes you to their staff record.
-
Clicking on jump logs you in as the user.
-
Clicking on (Set Groups) allows you to add an individual user as a member to a group
*A set of policies exists that may influence how the Security page functions.