Two Way Integration- Attaching Curricula to Create Sections in the LMS
With the School Pathways 2-Way integrations, students and their course sections are created in the LMS, and then nightly the assignment and grade data is brought back into the SP gradebooks.
Class Setup
Each bridge (two-way integration) is slightly different in how the courses are brought into School Pathways and which type of class you can attach it to.
CMS Only- Buzz/Agilix, Google Classroom
PLS Only- Edgenuity
PLS and CMS- Canvas, APEX, Edmentum
- While Google Classroom can be applied to both PLS and CMS, it is BEST in the CMS. When attaching Google Classroom to a PLS class, this will create a unique Google Classroom (GC) class per student.
Attaching the LMS Course to a School Pathways Class
Click the option below that best fits the scenario for your setup
Option 1: The Student course section ALREADY exists in the LMS
- Applies only to Google Classroom, Edgenuity, Edmentum
- Cannot be used for Buzz/Agilix (Schools PLP, Accelerate, etc-any vendor who runs over Buzz)
Option 2: Using School Pathways to create the new student course section in the LMS
- Applies to all bridge options
Buzz/Agilix requires that School Pathways be the creator of the student course sections in their LMS. You must use Option 2 for Buzz/Agilix. You cannot add students to classes manually in Buzz/Agilix as this will prevent the bridge from working properly.
Option 1: Using "Import Bridged Curricula" to associate the School Pathways class with the existing Course in the LMS
Does NOT work for Buzz/Agilix (Schools PLP, Accelerate, etc)
- Navigate to the desired class in School Pathways (PLS or CSM)
- Edit the class
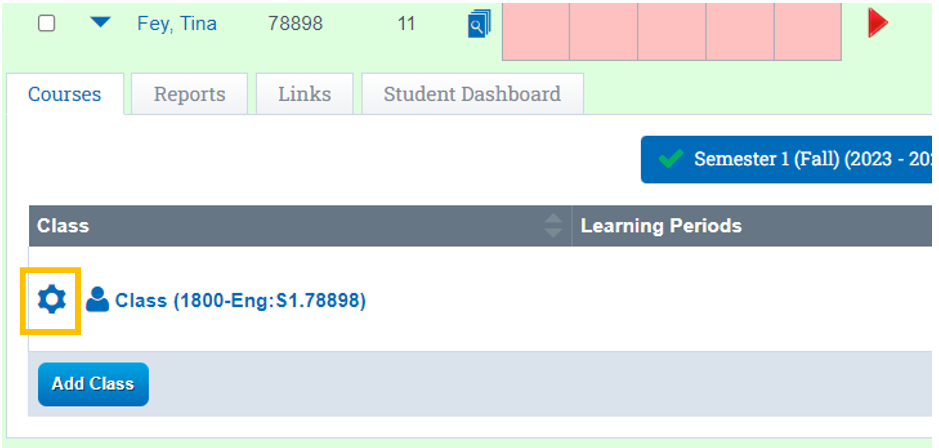
- PLS: Teachers>PLS Student Roster> Expand the student's blue arrow>Courses tab>Cogwheel for the desired PLS Class>Edit Curriculum
- CMS: Teachers>CMS Classroom Management>Book icon to edit the desired CMS class
- On the Curriculm tab, as the teacher you will see the option for "Import Bridged Curriculum"

If you do Not see this section, it can mean a few things
- You are not the primary instructor of the class in School Pathways
- Google Classroom- you are not linked to your Google Account and sharing with Google Classroom. See this guide on Staff Account Linking
- You do not currently have any student course sections available in the LMS to link to for this student
Example of clicking the button for Google Classroom:
- Once you have selected the course to link the SP class with, click "Link with Class". Let the page process, then SAVE the class.
- This may take a moment or two to process, let the page do it thing.
- Once you have received a Green Successful message, the class will be linked to it counterpart in the LMS. You should not see additional sections created in the LMS as you have used the option to Link to Existing classes in the LMS.
Option 2: Using the bridge to create the student sections in the LMS
- Navigate to the desired class in School Pathways (PLS or CSM)
- PLS: Teachers>PLS Student Roster> Expand the student's blue arrow>Courses tab>Cogwheel for the desired PLS Class>Edit Curriculum
- CMS: Teachers>CMS Classroom Management>Book icon to edit the desired CMS classEdit the class
- Find the class that will be connected to an external LMS

- Click on the Curriculum tab

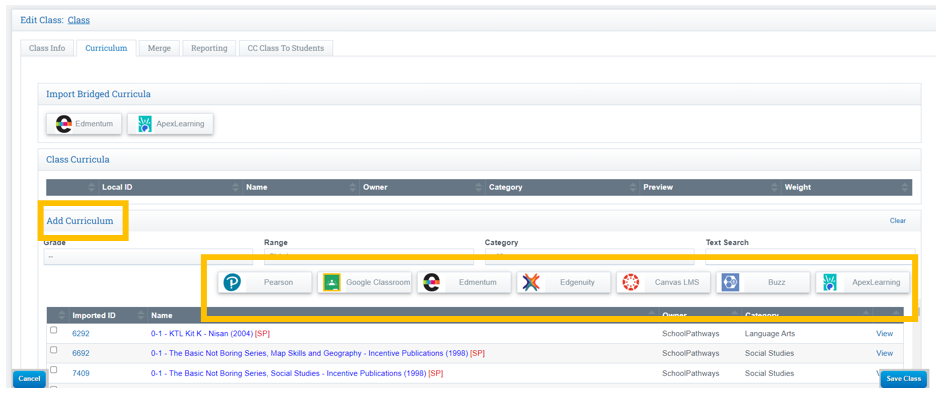
- In the Add Curriculum section- click on the button for the LMS you wish to add the student to for their course.
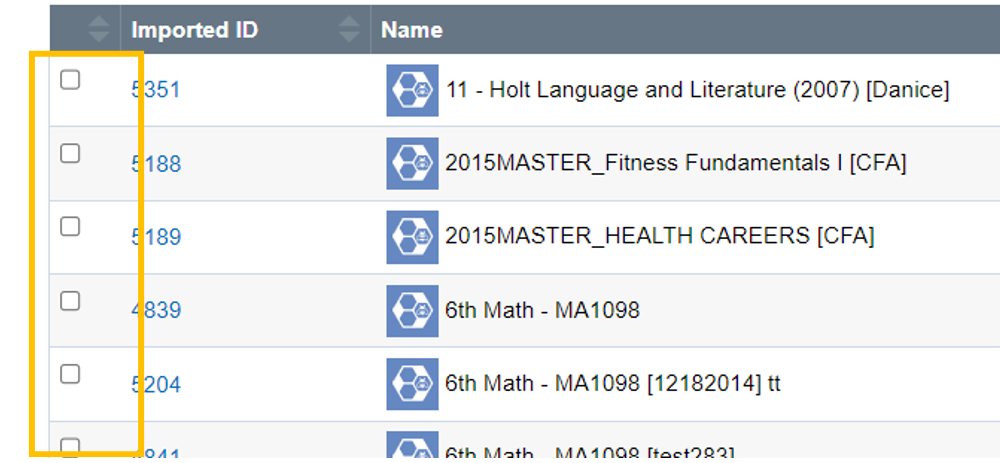
- Depending on your school's settings, you may have to adjust the Range to see the available courses associated with the LMS button chosen. LMS courses are identified by the Logo to the left of the curriculum name as seen below.

- Depending on your school's settings, you may have to adjust the Range to see the available courses associated with the LMS button chosen. LMS courses are identified by the Logo to the left of the curriculum name as seen below.
- This will display a list of results when you scroll down (this example I chose Buzz LMS). When I scroll down, I am seeing available courses from Buzz that my school has made available.

- Check the checkbox next to the course/curriculum you want the student to be placed in from the LMS

- You’ll see that when you check the box next to the course/curriculum, that the page will shift and look like below.

- Click Save Class
- Depending on your school's settings, if the registration is active and the student is enrolled, then student will be place in their course inside the LMS
- The roster will look like this- With the course (Spanish 1A) there will now be a curriculum associated with the class (Example below is Buzz). There will be gradebooks available (those in red to the left with the numbers by Learning Period). As students complete work, the grades will come back into School Pathways nightly.

