
In order to create a Master Agreement, students typically have to have classes listed. If the student does not have classes yet, then they will need to be added. Use this guide here
If you have already created a Master Agreement and need to make changes to the student's classes, it is recommended to create an Addendum after changes have been made to the students schedule.
Creating a Master Agreement:
Navigation: Teachers > PLS/Student Roster or Click on Roster from Teacher dashboard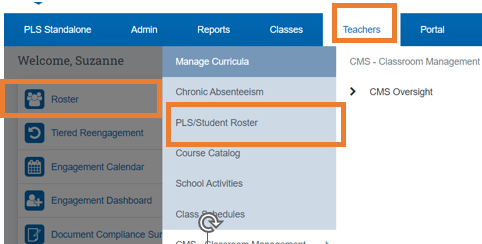
Expand the Student Roster section at the top of the screen to see the Filters
Select: Adjust filters as needed. If creating a Master Agreement for the future (next year, next semester), ensure that the School Year and Date Range filters are adjusted appropriately.
Click: the Search button
- Your roster will refresh and display the data based on the filters you chose above
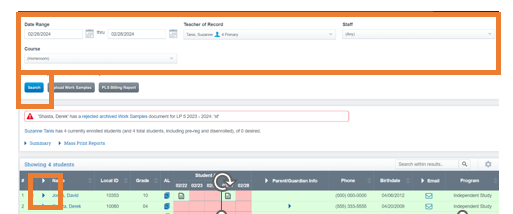
Navigate to the student and Click on the Blue arrow icon to expand the student. You will see additional tabs open: Courses, Reports, Master Agreement, Links, Student Dashboard
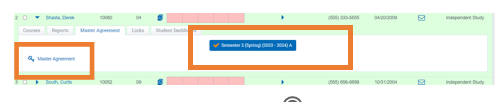
Step 5: Click on the Master Agreement tab

Next Screen might vary:
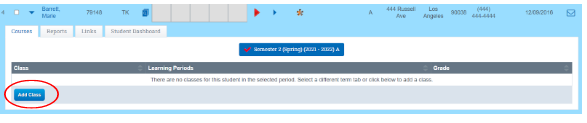
Skip this next step is student is enrolled in classes already
Click Add Class if the student isn't enrolled in any classes (refer to Creating a PLS Class User Guide)
*If their name is highlighted in blue(see above)that typically identifies the student as a pre-enroll. Once the student has an active enrollment, that will change the color to green.
Step 6: Click the blue Master Agreement link (be sure you are working the correct semester)
*When creating a master agreement for the first time or if the student has multiple enrollments within the filtered date range, you will see the following warning message. This is purely a warning and may be removed by clicking on the red x.
Step 7: The filters section will automatically be set to default, but you have the option to adjust the filters as needed. For example, if you are creating an addendum, you will need to change the first dropdown to "addendum."
Step 8: Click Save Master Agreement
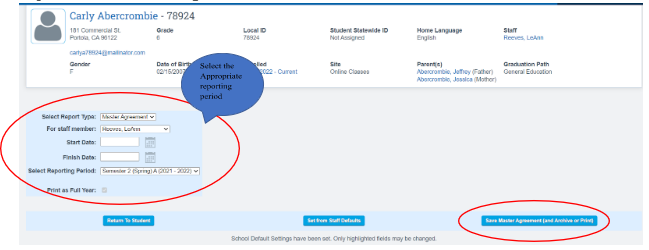
*All required fields must be inputted prior to saving master agreement.
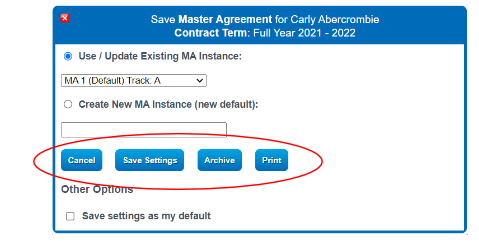
Step 9: Preview the Dialogue Box
*You can edit and customize the title of the new master agreement instance
Step 10: Click on the Save Settings, Archive or Print Options
for the first time creating a MA you will need to click Save Settings, then Archive
* If the student already has a signed and accepted Master Agreement for the date range specified, you’ll receive a warning message. This is a warning that may be bypassed if desired. If you wish to proceed you can click the Continue button to move past notification or Cancel to return to the PLS Roster.
Important Information:
- If School Default Settings have been set for the Master Agreement, only highlighted fields in green can be edited. If you wish to copy master agreement settings from the most recent master agreement document, click COPY from most recent Master Agreement tab
- If a save is attempted prior to a required field being input, you will receive a warning to return to the master agreement settings page and input missing field.
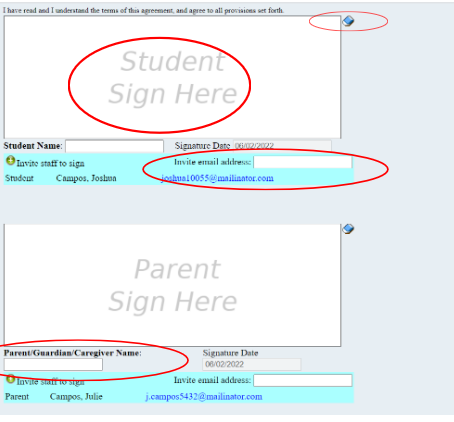
- The Master Agreement document will open in a web version with signature boxes. If a student and parent are not available to sign the document on your computer at the time of creation, you can email one or both an invitation to sign.
Click in the INVITE Email Address box (to invite them to sign virtually)
Then click on the Email that appears below the box to select the email you want to send the invite to
OR
Click in the box that says Student/Teacher or Parent Sign Here and begin to sign electronically. Click the eraser tool in the right hand corner to redo your signature.
Use Other Staff signature boxes to invite additional staff that might need to sign the Master Agreement. For example, SPED or Counseling Oversight Staff Members.
You may invite by email or click on the Green invite staff to sign.. button to search by name or position if email is unknown.
Optional Feature: Enter Teacher Name into the text box, then Click the E-signature Box, this will populate the signature as typed in the “Teacher Name Box” 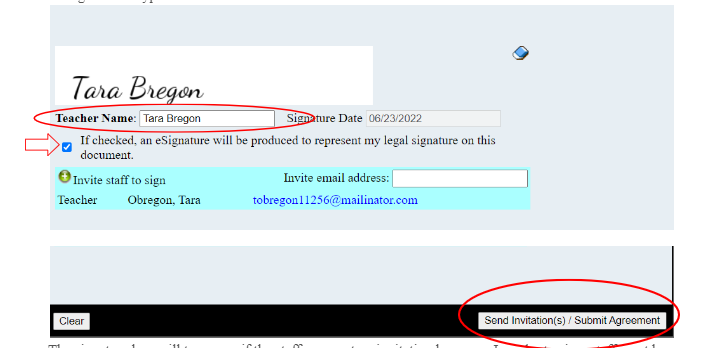
- The signature box will turn gray if the staff was sent an invitation by name. In order to sign, staff must be logged into the SIS under their user login.
Repeat this process for the Acknowledgements and Responsibilities document if applicable. - When all invitations have been entered or fulfilled, click on Send Invitation(s) / Submit Agreement at the bottom of the page.
- Documents are then automatically emailed to any student, parent/guardian/caregiver, as well as staff to sign. They will receive an email with the Click Here to Sign Invitation Link directing them to sign using their computer mouse, stylus pen or touchpad on their keyboard.
Parent/Student/Staff Invite Signature Preview
Users will scroll down the document to identify requested signature areas noted by the Sign Here/ Post it note. Once all Signature requests have been fulfilled, click on the Send Invitation(s) / Submit Agreement button at the bottom of the page.
Finalize the Process
- Once all parties have successfully signed and submitted the document to you (Supervising Teacher) for finalization, you will receive an email in your Inbox asking you to finalize the document by Clicking on the appropriate link provided.
- Review the document for complete Signatures and click the Send Invitations(s) / Submit Agreement button at the bottom of the page.